Here's a link to the Springville Museum of Art in Utah. I came across the site while searching for some lesson plan ideas. They have a huge selection of downloadable lessons in pdf format on everything from the elements and principles to feminist art. It's definitely worth taking the time to check out. They don't mail the lesson packets out, so your stuck with what they offer in digital form, but its still a pretty good amount of resources.
The link from the homepage in under 'education' then 'lesson packets'
Thursday, December 31, 2009
Wednesday, December 30, 2009
Spring Cleaning in December


I spent a ton of time cleaning up all my watercolor palettes from school. Most of them weren't so bad which I was happy about, espeically because I drill my students about treating the supplies with respect. While cleaning, my paper towels ended up looking like tie-dyed handkerchiefs so I decided to save them. I'm not sure for what exactly, but I figure at the very least I can use them as extra materials for collage projects. We art teachers are so thrifty! :)
Saturday, December 26, 2009
3rd grade fall landscapes


Sometimes I feel like not matter how early I start the lesson I always end up being late. I began these landscapes about 8 weeks ago and between class cancellations, which I feel like happen way too frequently
, I just finished the lesson on Wednesday, the last day before break! I suppose my fall landscapes are going to be hung for winter, but oh well, I suppose better late than never, and besides their way too good to not get hung.
Thursday, December 24, 2009
1st Grade Faith Ringgold 'Tar Beach' Quilts


I love love love the book 'Tar Beach' by Faith Ringgold, it's such a good story with serious and important messages woven very effectively into the story. My first graders absolutely loved it. We discussed imagination and dreams, we also discussed segregation and prejudice. For the art project I bought a book of patterned scrapbook papers and cut a few of them into 3x3" squares. I then used light blue paper off the jumbo roll I had for the background. Students worked in groups of 4-5 and were each responsible for creating a building and a person (themselves) that they would cut and paste onto the background. I reminded them that whatever building they were going to draw had to be something they wanted, similar to the way in the story that the character Cassie Louise Lightfoot would fly over and the buildings she wanted to own. They then worked as a team to draw a bridge which I then helped each group individually glitter. The lesson went really well, the only difficulties I had were the students not being able to effectively communicate with one another in their group and as a result some bickering and complaining ensued. I tried to model how to share and cooperatively use the materials as well as how to discuss who would do what parts of the image, but they have such a small amount of experience really working collaboratively that it was a real challenge. Also, I spent an entire period modeling, discussing, and brainstorming ideas with them on how to add 'detail' to their work so that the buildings would have sidewalks, grass, flowers, trees, etc. but I still didn't really get as much detail as I would have liked from them. It was funny because the day before I finished the project with them I was talking about drawing with one of our kindergarten teachers and she was saying how she really tries to push the students to include details and characteristics of the objects they are drawing, and that developmentally at those ages, its hard for them to do so. So by pushing for details in their artwork, your really trying to get them to improve and surpass their normal ability range, which is always a good thing. So next time, details, details, details!
Saturday, December 19, 2009
Such an easy, cute idea. I had to share it.

I'm subscribed to a website called Photojojo. They have all kinds of neat ideas for photographs, and every once in a while I get sent something that I actually take the time to do! Here's a very cute (and easy) idea for photo coasters. Of course, I don't use coasters, but I suppose I'm going to have to start!
Here's the link:
Photojojo=DIY Photo Coasters
Friday, December 18, 2009
5th Grade Romare Bearden-'My Block'


I love the artwork of Romare Bearden. I also firmly believe that no one artist or type of art is too 'hard' or complicated to teach elementary school aged children. In my opinion its all a matter of being selective in the works you chose to show and the range of information you chose to focus on. The majority of my students are minority, inner city children, so its important for me to expose them to not only styles and artists from different periods and various places around the world to show them artists inspirations are derived from experiences/ideas similar to theirs. To me, Romare Bearden is a great example of this. His inspirations are pulled from New York urban life, the African American diaspora, jazz, country life, spirituality, and personal views. In studying his work we examined 'The Dove' and 'My Block' and I had the students create a rendering of their block from this. They used oil pastels to color and add texture, then collaged in elements over their drawings. Lastly, the collaged in a title to represent the spirit/theme/idea/message of the block they live on. While working we listened to the jazz music of the Harlem Renaissance and discussed the idea of improvisation in music and in art. I told them, "don't look for the collage elements that you want in your artwork, you'll go crazy trying to find that 'just right' piece. Instead, improvise, think of ways you can incorporate those found pieces into your work instead." It was a very challenging lesson for them, but I think it was a great lesson to start the year off with and they really loved Bearden's work.


Thursday, December 17, 2009
4th grade rose windows


In 4th grade at some point in the year students study the Medieval Ages. In accordance with that, I did a lesson on stained glass 'rose' windows. To begin with, we brainstormed as a class all the things we knew about the Medieval Ages, then I introduced the vocabulary that went along with the lesson including transparent, opaque, radial symmetry, symmetry. pattern, design, and the use of stained glass during medieval times. I gave each student a 14 x 14" square of white paper and a pre-made 'slice' to trace to create their circles. I would have used a compass, but the classes didn't have them. After their circle was made we discussed ideas for designs which they then drew on their slice and traced over it on both sides with a black marker. They then flipped and traced their designs till their circle was complete. Lastly we added watercolor paints and outlined the design with a mixture of tempera and glue (home-made puffy paint) to create the leaded outline effect of stained glass windows. The lesson was very challenging for the 4th grade but was worth it!
Tuesday, December 15, 2009
3rd grade native american petroglyphs


Petroglyph- a carving or line drawing on rock (especially one made by prehistoric people)
Pictograph- (also called pictogram or pictogramme) is a pictorial representation of an object. Earliest examples of pictographs include ancient or prehistoric drawings or paintings found on rock walls.
3rd grade studied the early settlers of America, so I immediately thought the Anasazi or ancient Indian tribes. I had seen a variation of this lesson for kindergarten but never understood how the art teacher pulled off having kindergarten students create such complex stencils (she didn't say in the lesson that she had pre-made them). So I decided to try this lesson with my 3rd graders. I had done a variation of the lesson before with a mixed age grouping of children and instead of painting the stencils on, as I had my students do this time, I had them cut out the stencils and glue them on the paper, the results of which I wasn't too crazy about. had each student create a symbol, something that represented them, and demonstrated how to cut out things from the center by folding and 'nipping' the inside first. Some students picked it up right away and some had a hard time with it. All in all the lesson went well. I found a few good resources for teaching Native American rock art, here are some links below:
This is a good contemporary artist link for the lesson:
www.artsconnected.org/artsnetmn/identity/white.html
'Talking Rocks' A lesson plan by Nancy Ratzloff- a great resource for introduction activities for the lesson (you can also link to this site from the link above)
http://www.artsconnected.org/artsnetmn/identity/talking_rocks/ratzlesson.html
The original lesson idea:
www.princetonol.com/groups/iad/lessons/elem/maryj-rock.htm


Monday, December 14, 2009
Sand Animation
As usual, I found this on the Getty Listserv, one of the regular contributors posted this about a video he had seen and which I just checked out:
"This is well worth the 8 1/2 minutes to watch.
Don't miss this amazing Video Clip . . first read it properly..This video shows the winner of "Ukraine s Got Talent", Kseniya Simonova, 24, drawing a series of pictures on an illuminated sand table showing how ordinary people were affected by the German invasion during World War II. Her talent, which admittedly is a strange one, is mesmeric to watch. The images, projected onto a large screen, moved many in the audience to tears and she won the top prize of about $130,000.00 She begins by creating a scene showing a couple sitting holding hands on a bench under a starry sky, but then warplanes appear and the happy scene is obliterated.
It is replaced by a woman s face crying, but then a baby arrives and the woman smiles again. Once again war returns and Miss Simonova throws the sand into chaos from which a young woman s face appears. She quickly becomes an old widow, her face wrinkled and sad, before the image turns into a monument to an Unknown Soldier.
This outdoor scene becomes framed by a window as if the viewer is looking out on the monument from within a house.
In the final scene, a mother and child appear inside and a man standing outside, with his hands pressed against the glass, saying goodbye. The Great Patriotic War, as it is called in Ukraine, resulted in one in four of the population being killed with eight to 11 million deaths out of a population of 42 million.
Kseniya Simonova says: "I find it difficult enough to create art using paper and pencils or paintbrushes, but using sand and fingers is beyond me. The art, especially when the war is used as the subject matter, even brings some audience members to tears. And there s surely no biggercompliment."
Please take time out to see this amazing piece of art"
Believe me, it is well worth your time!
Sunday, December 13, 2009
2nd Grade Picasso Face Monsters

This lesson was originally adapted from pictures I had seen on the 'Artsonia' website from a school I can't remember the name of. In the original lesson the teacher uses construction paper to create the face and details, along with glitter and iridescent paper. I decided it would work better for me to use oil pastels. Plus the students had prior experience with that medium from doing their Chagall pieces. I used guided practice, drawing the faces on the board as they drew along with me on practice paper first. Each student then got two pieces of construction paper that they glued together to make a 9" x 15" long piece of paper. They had a really fun time turning their Picasso inspired cubist faces into monsters! Plus I used gold paper to add embellishments instead of glitter, which they also really liked.
Thursday, December 10, 2009
2nd Grade "I and the Village-after Marc Chagall


I got this lesson off of the incredible art department website (love it!) In the original lesson the teacher did it on 18x24" paper which I thought would be way too big for my students, especially because this was the first lesson of the year I did with them. Instead I had them work on 14x17" paper which was just challenging enough for them. They needed a lot of encouragement to cover the entire paper with color, many times proclaiming they were done when they weren't. I also found they need a pretty thorough exploration of a 'dreamscape' and why they had to turn their paper multiple times throughout their drawing. Intrinsically they wanted to keep the paper the 'right' way, so I had to work to break them of their conventions. Next time I"m going to show them other images besides Chagall's 'I and the Village' to help reinforce some concepts. I'm also going to use the images as the lesson opener and closer, which will also help reinforce concepts. In the incredible art department website the teacher says that her 'students jumped right in, and loved it' but my students are a bit more skeptical so, it all depends on the needs and dynamic of your kids. Overall thought the lesson went well. Like all lessons, it'll be even better the second time around.
Here's the link to the original lesson:
http://www.princetonol.com/groups/iad/lessons/elem/stephanie-chagall.htm
Wednesday, December 9, 2009
1st Grade Solar Systems


In first grade students start to learn about planets in the solar system. I would have loved to do something 3D for it, but I don't have any 3D materials so I decided to go with chalk pastels on black paper. I've done a lesson like this before, but it was on 11x14" paper and this time I did it on 9x12" paper. I definately recommend the larger of the 2 sizes. Although the students had a good time doing this lesson I found the standard size to be too restrictive a space for such a fun and exploratory medium. I had them begin by using circle templates of various sizes. We discussed scale and the way objects are larger in the front and get smaller as they go back or recede, in space. I reviewed the acronym 'My Very Excellent Mother Just Served Us Nine Pizza's to help them remember the planets order. I also showed them how to blend charcoal. Each planet had to have 3 colors in it. At least 1 planet had to be cropped, and they needed a minimum of 4 planets in their picture, with one of them being rendered realistically.
To tie in with the solar system lesson I read the students 'Postcards From Pluto' and had them create their own postcards. I gave the students who needed extra support sentence starters and/or a structured paragraph. I had them write "I went to __________. It was ___________. I saw _____________. See you back on Earth! Love/From/Your Friend/Sincerely ___________. This was the first grades first project of the year so I wasn't sure of their ability range. The students that were more autonomous were able to write their own paragraphs, but most needed some supports. All and all it went well. Best of all, they loved the medium, which I knew they would because anything messy is par for the course in the early childhood grades!
Tuesday, December 8, 2009
Aboriginal Art-Warm Colored Dot & Symbol Paintings-Kindergarten

In an attempt (notice how I saw attempt) to have kindergarten create something fall/November themed, using warm colors, and integrating their '7-Continents' Social Studies Unit. I found an image of these aboriginal inspired dot paintings while searching google. The 'attempting' part, wasn't that I didn't get the lesson right, it was just that between everything that goes on I ended up finishing them this week. I suppose a week or so after November isn't so bad.
To begin with I showed them a book about Australia and Aborigines. We discussed dessert climates and what colors go with them. We then segued into 'warm' colors and I made a chart to show them which colors they were for reference. I had them work with a partner to trace and then cut their hands, showing them (repeatedly) how to handle and cut scissors. I can't tell you how many times I said "Don't get out of your seats with the scissors!!" :) Some were able to cut out their hands really well and others struggled. After they glued it on their paper (Thumbs facing one another. I had them make paint dots with Q-tips around the boarder. The second to last day we practiced creating 'dot' symbols, I did the swirl and and arrow on an erasable whiteboard. When I saw they got a feel for it. I had them go back and paint them in using white paint. They also had to do their initials in dots on their hands. Here's some finished examples.
Here's the site I got the original art idea from: It was originally taught by Mr. Webb (credit to him) but did it for 2nd grade.
http://smsd.digication.com/home_guest.digi?sid=1587&cid=0&tid=0&pid=4531&


Thursday, December 3, 2009
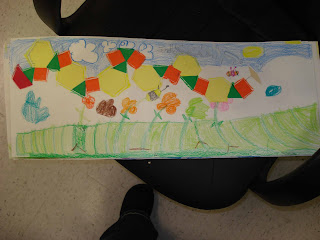
kindergarten 'Pattern Snakes'
As an extension to the kindergarten curriculum I had students create pattern snakes. They had previously learned AB and ABC patterns and I took that as an opportunity to do something with it. I traced and pre-cut pattern blocks using the same colors (I got a pack of card stock which had all the same colors in it except for beige which I bought separately by the sheet for like 20 cents a piece at A.C.Moore) As a class we discussed wavy lines vs. straight lines. I showed them the book Snakes; Long, Longer, Longest' by scholastic and had them draw a wavy line across a 12" x 24" piece of white paper as a guide. We then spent 1 session practicing pattern making with our pattern block cut-outs and 1 session gluing them down making sure the pieces were touching and following the wavy line. They used to shapes for the head and tail that were not part of their pattern and then we discussed what kinds of setting you would draw a snake in. The lesson was also a good opportunity to review shapes with the students.
Next time I could also have the students trace and color snakes instead of pre-cutting them out. I had a blister on my thumb for 2 weeks after all that cutting! Also, this lesson makes it really easy to differentiate because for those students who are advanced you could have them create their own pattern and for those who need more reinforcement, they could write out their pattern before doing it.
All in all the lesson went really well and I'm very pleased with the results!


Tuesday, December 1, 2009
Kindergarten 'Spooktacular Haunted Houses'
For Halloween I used the theme of haunted houses (which every child loves to talk about regardless of age!) to teach primary and secondary colors. To initiate the lesson I taught them the two songs. The primary color song is sung to the theme of '3 Blind Mice' and goes as follows:
Red, yellow, and blue
Red, yellow, and blue
They are the pri-mary colors
They make up all the other colors
Red, yellow, and blue
Red, yellow, and blue
The secondary color song is sung to the 'Cha-Cha' and goes:
Or-ange, green, and pur-ple
Or-ange, green, and pur-ple
They're the secondaries!
They're the secondaries!
For the secondary song I even have them form a train and cha-cha around the room. It's very cute and it really helps the information stick. I'll ask them weeks later what the primary colors are and they'll remember!
Following that introduction I give them shapes I've previously cut out and let them arrange the house. Despite the uniformity in the pre-cuts, its amazing to see how varied the results come out. The next time we met, we reviewed the colors and I read them the book 'In the Haunted House' by Eve Bunting, this sparked a ton of ideas for what they could draw or add to their house. After making a list of their ideas and drawing a few examples (of shutters, ghosts, bats, smoke, brick, ghouls, etc) I let them have at it with crayons and they had a ball! The picture I'm posting is a mini-display I did for my office. (I share an office with the PE teacher, technology teacher, and Spanish teacher because we all push in to classrooms)
Note: the shabby sign the tech teacher put up on the bulletin board exclaiming 'all about me haunted houses' is incorrect and only got put there at the behest of my principal. :)

Red, yellow, and blue
Red, yellow, and blue
They are the pri-mary colors
They make up all the other colors
Red, yellow, and blue
Red, yellow, and blue
The secondary color song is sung to the 'Cha-Cha' and goes:
Or-ange, green, and pur-ple
Or-ange, green, and pur-ple
They're the secondaries!
They're the secondaries!
For the secondary song I even have them form a train and cha-cha around the room. It's very cute and it really helps the information stick. I'll ask them weeks later what the primary colors are and they'll remember!
Following that introduction I give them shapes I've previously cut out and let them arrange the house. Despite the uniformity in the pre-cuts, its amazing to see how varied the results come out. The next time we met, we reviewed the colors and I read them the book 'In the Haunted House' by Eve Bunting, this sparked a ton of ideas for what they could draw or add to their house. After making a list of their ideas and drawing a few examples (of shutters, ghosts, bats, smoke, brick, ghouls, etc) I let them have at it with crayons and they had a ball! The picture I'm posting is a mini-display I did for my office. (I share an office with the PE teacher, technology teacher, and Spanish teacher because we all push in to classrooms)
Note: the shabby sign the tech teacher put up on the bulletin board exclaiming 'all about me haunted houses' is incorrect and only got put there at the behest of my principal. :)

Subscribe to:
Posts (Atom)