Wednesday, June 27, 2012

2nd Grade Dr. Seuss Prints

I had originally found a variation on this lesson while I was doing a Google image search for printmaking art lessons. I adapted the original landscape scenes within the lesson to Dr. Seuss style landscapes particularly from The Lorax.

 
 My students studied the life and work of Dr. Seuss along with landscape artist Thomas Cole.  I showed them Cole's work so they would have an understanding of foreground, middle-ground, and background and be able to draw a type of landscape that showed depth.
 
The great thing about this lesson is the small twist of using black paint with white ink as opposed to the more traditional white paper and black or dark color print.  To add color to the print I had students use construction paper crayons, and if the white of their print came out bright and clear they were able to get some really fantastic results.


 Because the print was 9x12" I had them create a rubbed texture border using rubbing plates and either silver or white crayons (oil pastels would work too).  They trimmed the edges of their print with fancy edged craft scissors and then glued it into the rubbed border. 
 The students really loved this project and I will definitely re-use it or something like it in the future.

Tuesday, June 26, 2012

2nd grade coil pots


 A favorite among all elementary students, the clay coil is a classic way to teach some basic tenants of ceramics.  In the project the students have the freedom to create coils of any size and thickness as well as construct their pot any height and width they'd like (well, maybe not ANY height they want, once it starts to lean I usually cut them off!).  As far as colors go, I didn't order enough glaze for all the projects this year so I ended up just putting out whatever colors I had, in this case it was purple, red, yellow, green, and blue.  The project itself took about 3-4 days in total including glazing.  For the supplies I used Amaco Low Fire White Art Clay and Mayco Stroke & Coat glazes. The clay has a nice texture, it's soft and smooth with almost no grog and doesn't stain because of its light beige color. It fires to an almost pure white, and if you make sure you leave amply drying time to get it to the greenware stage you have very little breakage when firing.  The Stroke & Coat is great because the colors are bright, shiny, and you really only need 2-coats of paint to cover the clay really well.  Here are some finished results:


Monday, June 25, 2012

End of year Laurel Burch Cats-Grade 1 and 2


You just can't go wrong with Laurel Burch! Any time I've ever taught a lesson on her art the students are really engaged and excited.  There must be something about her lively cats, fun colors, and wild patterns that really captures the attention of children.  This year as a quick 2-3 day project I decided to have my first and second graders make oil pastel and watercolor resist cats.  


First I showed the kids a PowerPoint on Laurel Burch with brief tidbits about her life.  We discussed the concept of folk art and how artists create artwork for all different reasons including religious, political, personal, social, etc, and how some artists create art simply because they love working with different materials and to make themselves and others happy.  The universal appeal and quality of Burch's work really makes for a great example to illustrate the idea of youth, nature and harmony and my students really seem to like that.  


After learning about Burch I do a demonstration on how to draw a sitting and jumping cat and then brainstorm with my classes different patterns and designs they can create to fill the cat and background of their paper.  


The following session we review how to use watercolor paints and how to change values using various amounts of water.  I emphasize to the kids that in order to really see the cat and the designs that lighter values work best, however, many of them being so enamored with watercolors, end up dowsing their paintings in deep tones of almost every color in the palette. Except for brown, not too many students use brown, lol!
 Other than that I encouraged students to try any ideas they had and have fun.  The results were great!


Sunday, June 24, 2012

1st Grade Van Gogh Portraits

I was looking for an end of year project to do with my marvelous 1st graders and I remembered back to last years Starry Night Silhouettes and how much fun last years first graders had working with oil pastels to blend wavy swirly skies 


Being that my first graders are really focused this year, I decided to step the project up a notch by incorporating  portraiture.  I was a real stickler for making sure the entire background was completely colored and that the students used realistic colors to render their faces.  Each student even got a mirror to make sure they were drawing what they observed and not what they thought they looked like.
 I began by giving a demonstration on how to draw the features of the face along with helpful tips like drawing the eyes in an oval shape, creating the small 'v' in the center of the top lip, making sure the ears start at the eyes and end at the tip of the nose, etc.  Then as a class we did a guided drawing while the students looked at themselves in their mirrors. 
The next session I demonstrated how to color their faces and hair and how to use natural colors as opposed to artificial ones. 
For the background we students the life and work of Van Gogh and in particular his Starry Nights painting.  Students chose warm or cool oil pastels to work.  


 I absolutely adored this project, my kids really did a phenomenal job.

Saturday, June 23, 2012

Gearing up for summer school-Quick and easy diy sketchbooks

This year I'm teaching 2 different classes, a sketching and painting class and my usual crafts class.  In preparation for them I came across a very cute tutorial on how to create a sketch book using duct tape.  I'm teaching middle school children so I don't want anything overwhelmingly challenging and this sketchbook video is a perfect way to hand-make your own sketchbook.  I think it will make the perfect companion for preliminary painting sketches and studies.

                     'Quick & Easy Hardback Sketchbooks'

Materials: 
 
·        Cardboard, Matboard, or shirt box cardboard cut into 2 8 ½ x 6” pieces
·         Duct Tape(OPT: Can use colored duck tape)
·         Scissors
·         6 sheets of white printer paper. 
·         Stapler
·         Eraser
·         Metal  or wood ruler
     
      Steps
o   Lay the cardboard covers on the sticky side of the tape leaving a gap between the pieces.  Place a piece of duct tape over it and really press it down creating a crease where the gap was.
o   Fold printer paper in half and lay it open with the center fold lined up with the crease. Turn book over so tape side is up and staple.
o   To staple, place rubber eraser under the book and opening the stapler, staple through book into rubber eraser. Use ruler to fold down opened staples.


Friday, June 22, 2012

Kinder 'Wild Things'


On the last day of art I had my students watch an animated version of Maurice Sendak's Where the Wild Things Are.  I asked my students to take notice of what shapes and features the wild things were made of  and after the video I recorded a list of parts that included yellow eyes, feathers, horns, fangs, tails, scales, and claws.  Following the video I did a short demo on how to draw a wild thing by using basic shapes like ovals, circles, triangles, etc.  I then set them loose on 12 x 18" black paper and using crayola construction paper crayons, they dove right in.

 The drawing part took about 15 minutes, although some students pronounced "I'm done!" within about 4 minutes of drawing...However, I wouldn't let them off the hook with quick 'scribble-scrabble' coloring,  and made them take their time and color their monsters in slowly and completely to the best of their ability. For the last 10 minutes or so I explained how to rotate tables to switch colors and let them paint over their drawing using Sax brand glitter paint.  Each table had one of four colors including gold, purple, green, and blue (which were what I used) and 4 brushes.

  Students had about 2 minutes at each table with the paints and presto, finished wild things in 40 minutes :)

Just on an additional note...I like the crayola construction paper crayons, they come out a little brighter and opaque on both light and dark colored construction papers.  I'm so-so on the glitter paint.  It's semi transparent so I think it's good for painting over already colored areas like I did in this project, but I wouldn't use it by itself on unless a I wanted a semi-transparent color with small flecks of glitter throughout. 


Sunday, June 17, 2012

Kindergarten Birds and Bird Nests

What do you do with just a TINY amount of clay left for the year?  Make kindergarten pinch pots of course!!  Tired of plain old pinch pots, (as I'm sure we all are!) I decided to turn them into 'bird nests'.  The whole process took 3 days.
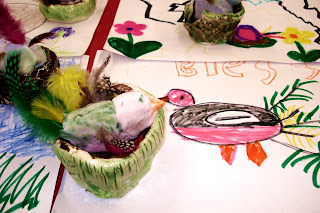
On the first day I discussed where clay comes from, how it gets hard or soft depending on the moisture, how it gets its color, and how to manipulate it.  I had a 2-slide power point with different things artists do with clay and how my students can manipulate it by pinching, pulling, squeezing, smushing, twisting, and so forth.  As a class, at my large demo table we all practiced using our hands and arms to 'explore' the clay.  I refrained from using the word play, as I didn't want the students to get the wrong idea about what do to with it.  I also explained to them that we don't hit, slap, smack, or throw the clay at any time.  Thankfully,I had few if any students handle the clay improperly. For the remainder of the period students sat at their tables and explored the different things they could make with clay.
On the second day we had a more formal lesson where I demonstrated how to wedge the clay, create a pinch pot, and then add texture to the outside by using different texture stamps around the pinch pot, and if large enough, inside them.
Day three came about 2 weeks later, after the clay had dried and been fired.  My first 3 classes I had glaze their pots with green and brown stroke n coat.  When I ran out of glaze (it was the second to last week of school) I had my remaining 3 classes use brown and green tempera.  Both came out cute.

 The week or so between the clay drying and being fired I had my students create Model Magic birds, I would've liked them to create their birds out of clay but I didn't have enough. In the end it worked out well, I was able to have the students add feathers and pipe cleaners which wouldn't have happened with traditional clay. We made the birds by using 1 package of model magic colored with Mr. Sketch to alter the color.  Students rolled the package into 1 large and 1 small ball of clay and pinched both balls to make a large tail and a tiny pinched beak.  The had and tail were attached and feathers and pipe cleaners were attached to the tail and sides of the body. 

As an extension activity for students that finished early, I gave each student a piece of  9x12" white paper and markers and had them do an observational drawing of their bird and nest.  They can out adorable.  It was a good end of year project and it was done just in time for fathers day!


Friday, June 15, 2012

The best new thing this week...well it's not new

The other day I was in A.C. Moore looking for a plastic bird for my front door wreath when I came across these great photo reference books for $ 5. 00 a piece.  They are loaded with images and come with a CD ROM of pictures as well.  Whenever I teach a lesson that requires drawing I try to give my students photo reference, it really helps the quality of their work when they have a reference image to use instead of trying to generate ideas from the few images I show them in a PowerPoint or from their head. 

Next year I'll be teaching a unit on Pre-columbian art to my 4th graders and Native American art to my 5th graders and picking up both these books was a HUGE help, now I don't have to fish through google or tons of library books for thematic photographs, I can just use the books!  I haven't checked out the CD's  yet, but I'm hoping I can just pull images off of it and put them into my digital files for presentations.  This is the best new thing I've found all week! :)

Pre-Columbian Mexican Designs CD-ROM and Book (Dover Electronic Clip Art) North American Indian Motifs CD-ROM and Book (Dover Electronic Clip Art)


Sunday, June 10, 2012

Kindergarten Color Wheel Clowns

After teaching my students all about primary colors and lines I wanted a project that would introduce them to the secondary colors and show them how primary and secondary colors are connected to one another in terms of color theory.  I came across color wheel clowns on some blogs and websites noted below and decided to try it out. 

Deep Space Sparkle
DebraSnowArt
Tatanka Art
Studio Zanne

We began by discussing patterns and looking at different clowns and their bright colorful pattern-filled clothing, I then had the students use 12x18" white paper folded in half to paint two different patterns.  Later on, these patterns would be cut up and used to collage the arms and legs of their clown.  After that I had them trace a plastic lid on a 9x12" piece of white paper and draw and then cut out their clowns face.  Before they drew their face, I put up a few images on the Smartboard for them to view as reference.  I then pre-made a color wheel about the size of a 9x12 paper and demonstrated how to paint a color using only the primary colors. I posted a picture of the color wheel and showed them that if they paint the primaries first, they can figure out which two colors mix together to make the secondaries. Lastly, students collage on the head, body, arms and legs and draw on hands and feet. 
The thing I love most about this project is the vast differences in the final product and the lively and humorous expressions the clowns have.  They really do embody the personalities of their creators!
I'll post a few more individual pictures in the next day or two.